Canmore Community Gardening Society
Growing Food! Building Community! Gardening Together!
Insect Pests in Our Garden Part 1: Cutworm
In Canmore, we don’t have as many pests as they have in warmer climates, however we do have some. This blog will review some of the bad bugs we have in our Community Garden, and what we can do about them.
When we notice a pest, it is important to assess several factors in order to decide what action to take (know your enemy!).
- What are the signs indicating the problem? A lot of the time we won’t actually see the bug right away so it is important to be tuned in to our plants and notice anything out of the ordinary.
- What is the insect’s life cycle? Often it is one stage of the life cycle that causes the damage, so it is important to know if the insect has one generation or several within a season. How/where does the insect overwinter?
- What is the insect’s behaviour? How does it cause damage and can we do things to interfere with this behaviour that would reduce the damage?
- What are the insect’s natural predators and are they present in our garden? Sometimes we can sit back and let Nature do pest control work for us.
- Is there something the insect loves even more than our food? Sometimes if we offer them something better they will leave our crops for us.
- How bad is it, really? Is the insect causing major damage to our crops, and if so how quickly is it moving? Will it spread to other areas of the Garden or will it stay in one spot? Is it as bad as it looks? Often we have a gut reaction to seeing insect damage and go to the extreme of pest control when the reality is the insect will munch a little bit then move on with its life, leaving most of the crop for us. I have a farmer friend whose mantra is “Bugs get some, I get some”. He also takes it as a good sign when he’s buying produce if there are bugs and worms on it because that means there isn’t pesticide on it. When we’re gardening organically, we have to take a good hard look at what’s really necessary when it comes to pest control, even organic pest control.
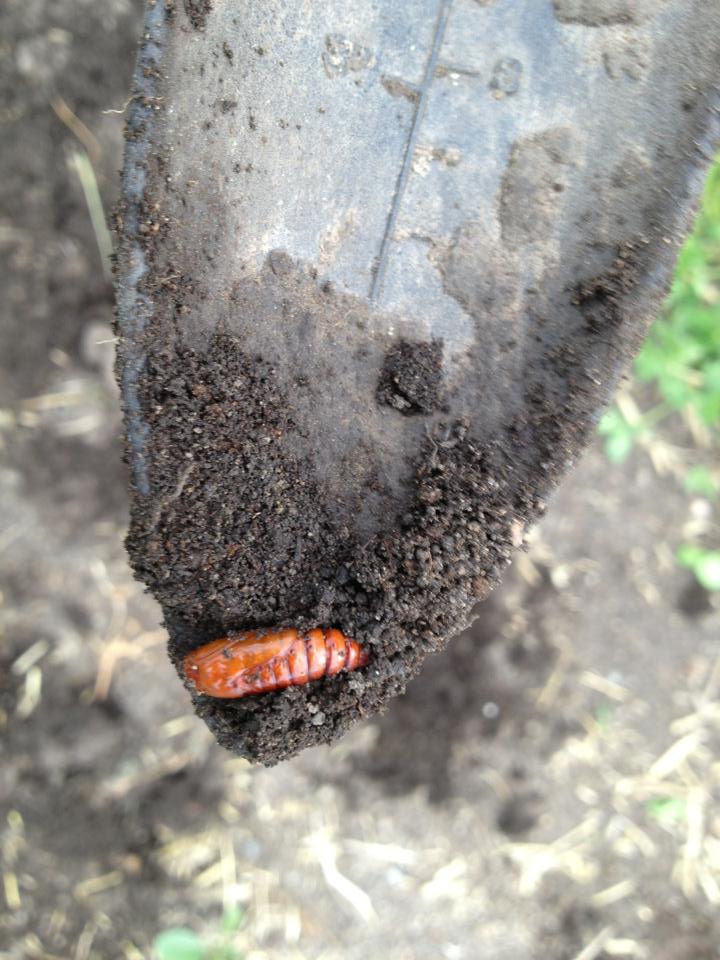
CUTWORM

The most destructive pest we had in our garden last year was cutworm. It almost completely decimated our brassicas crop. Read on for more information, but in a nutshell, our early frost-resistant crops are the most susceptible as they are what is there when the cutworm are at their destructive larval stage. We can best protect new seedlings with collars (toilet paper rolls work well!), hand-picking at night, and sprinkling corn meal for them to eat instead of our plants. Save some seedlings and be ready to replant later in June if necessary. It is important to note that they can appear in any garden bed and are not necessarily localized to the same bed from year to year.
Signs: You won’t likely see the little guys. You will go in to the garden one day to find that your seedlings appear to have been mowed down at the soil surface.
What it is: Cutworm is actually a little caterpillar that is the larvae of a largish brown moth. The caterpillars are smooth and come in several colours from brown to greenish to pinkish.
Life cycle: Eggs that overwintered in the soil hatch in early spring and the voracious larvae go looking for new seedlings. By mid-June they have started to pupate in the soil, emerging as moths in the summer. At the beginning of Fall the moths look for good places to lay their eggs and the whole process starts again the following Spring. One generation. This explains why cool-weather crops like brassicas are more affected than warm-weather crops like squash; because they are in the garden at the right (or wrong) time.
Habits: They live in the soil just below the surface. At night, or on cloudy days, they will come out and crawl across the surface of the soil to the seedlings to feed. They do this by wrapping their little bodies around the little stem and start chewing.
How bad is the damage: It’s bad. They are capable of killing everything in the vicinity.
What we can do: This Spring:
- Protect new seedlings with collars around their stems, pushed about an inch into the soil so the worms can’t crawl under. Toilet paper rolls work well, but any kind of collar is fine, so plastic bottles, tubing… if you cut a slit in the collard to get it around the plant, make sure to tape it back together well so the worms can’t crawl through a gap.
- Putting a larger stick right next to the stem of the seedling will also prevent the worm from wrapping itself around the stem.
- Hand-picking. Go out at night with a flashlight and look for them on your plants, pick them off and squish.
- Cornmeal. Sprinkle cornmeal around your garden, cutworms apparently love it but it kills them.
- Wait until later in June to plant, when the worms have gone on to the next stage. Be prepared to replant parts of your garden if needed.
- Molasses. Paint a ring of molasses around your seedlings. When the worms crawl towards the seedlings they will get stuck and eventually die. Caveats: this can kill good bugs too, it needs to be replaced after rain or watering, and spreading molasses in our garden is probably frowned on in Canmore (do bears love molasses? Want to find out?)
- Diatomaceous earth. This is ground up fossil. It can be spread around the seedlings and works by cutting the worms so they dehydrate and die. Egg shell powder has been suggested for the same use, reports have been mixed. Caveats: Will kill good bugs too. Doesn’t keep the worms off the plants immediately; they take a while to die.
- Predatory Nematodes are very effective and safe. You can get them from most good garden supply websites. Make sure the variety you buy is rated for the cutworm. Caveats: Expensive, and you have to reapply every spring as they don’t survive the winter here.
What we can do: In the Fall:
- Over the summer, create a messy weedy environment that is more appealing for the moths to lay their eggs, then mow it down just before winter and remove the material from the garden to the landfill or fire pit.
- Turn the soil to expose eggs to the winter
- Don’t mulch.
https://www.youtube.com/watch?v=v1T3wUp1AwE
https://www.youtube.com/watch?v=9QhtXffs9Gw
UPDATE: Sebastien’s report from last year (photo soon)
These are what we found around june 15th although I remember seeing evidence of their presence at least a week before digging up the soil to find these guys. They were only found in the brassica side of the garden. The smaller plants were cut down but the larger ones seemed unaffected. All the plants in the area did have holes in the leaves but that was probably cabbage moth or something else. We put corn meal around each of the plants(apparently they eat it and it kills them) and collars around some of them. This may have helped but we also spent a fair bit of time digging them up. We dug up close to 100 worms/cocoons and the problem slowed.